![]()
Greetings, fellow data analysts!
With these familiar words, we welcome you to the 77th issue of DeltaMaster clicks!. A salutation for our entire readership. That is suitable and appropriate when addressing a message to a large group and not just to certain individuals personally. After all, personalizing DeltaMaster clicks! would entail a sizeable amount of technical effort.
When it comes to communicating reports or analytical findings, you often address both types of audiences. Besides sending some information 1:1 to a large group of recipients, you probably also provide certain individuals with tailored reports that show just the specific sales region, cost center, or business unit for which the recipient is responsible.
DeltaMaster provides powerful mechanisms that automate repetitive reporting tasks. The ReportServer, for example, is a proven tool to supply dozens, hundreds, or even thousands of recipients with information on their areas of responsibility. Every one of them. Effortlessly. What’s more, you can even use a personalized greeting. This issue of clicks! will provide you, fellow data analysts, with a few suggestions for these types of solutions.
Best regards,
Your Bissantz & Company team
When you have certain tasks that repeat themselves with little variation, it pays to check and see if you can automate them. One of these tasks is standard reporting, where you have to update the same reports on a regular basis and distribute them to the same recipients. Many DeltaMaster users create standard reports with the help of the ReportServer, a plug-in for DeltaMaster that automates routine reporting tasks.
Despite the routine and automation, standard reports built with the ReportServer don’t need to be impersonal. On the next few pages, you will discover a number of ways for sending personalized reports and messages to your readers. In particular, you will see how you can distribute personalized reports via e-mail as well as how you can communicate these matter-of-fact numbers in a polite yet binding manner – which, fortunately, is still good business etiquette.
Let’s again look at a few examples from our “Chair” reference model. This includes a dimension for customers. We will assume that a regional manager is responsible for each sales region and that you want to send e-mails to these individuals regularly to keep them up to date, for example, on their most important customers in the past month. In order to do that, you first need to know a few things:
- Where can you store personal information about the recipients (e.g. the names of the regional managers, their salutations, and e-mail addresses)?
- How can you use this information in DeltaMaster and the ReportServer?
- How can you add this personal information to the e-mails that you send using the ReportServer?
Member properties or attributes, an important concept in multidimensional databases, can be very helpful in answering these questions. But let’s start with the basics before delving into the details.
Know how. Know who.
If you want the ReportServer to provide tailored results for specific users, it first needs some information about them. Oftentimes, you just need a few attributes, such as the name of the report consumer, the salutation, the e-mail address, and possibly a storage directory for saving the generated report files. With this information, the ReportServer can generate reports for individual recipients, send them in personalized e-mails, and then file the reports in the specified directories.
But where does the ReportServer obtain this data about the report consumers? In the case of integrated solutions of the type we are striving for in business intelligence, it makes sense to include this information as member properties in the underlying data model. You can then manage this data in one central location and utilize it extremely flexibly throughout your DeltaMaster applications.
Member properties in the data model
The member properties that you need for creating personalized reports might not be available in some applications because this scenario wasn’t planned during their development. Adding them, however, is easy if the data model was generated with DeltaMaster Modeler or the TableWizard/CubeWizard.
In DeltaMaster Modeler, you can add the desired properties under “Level Attributes” and enter the table and column of the relational model containing these properties in the “Level Attributes Source Columns”.
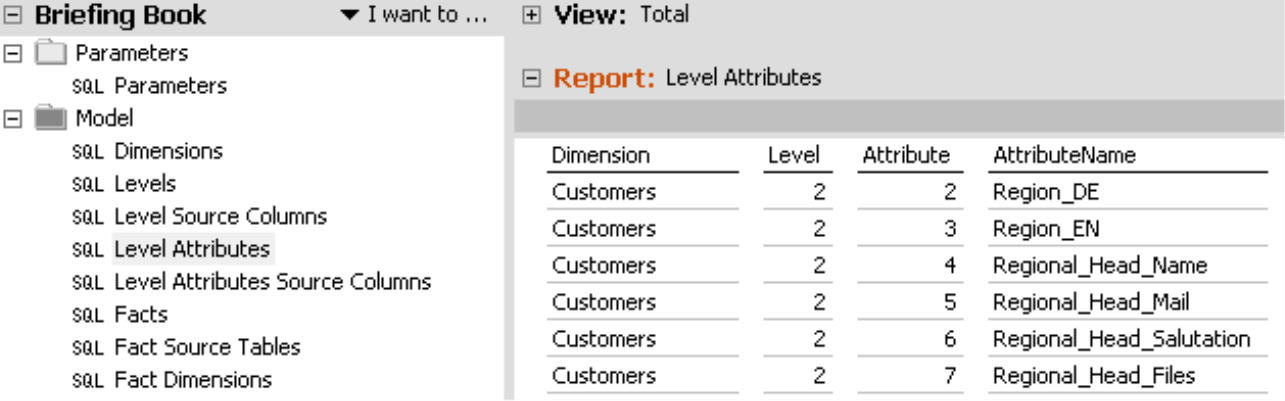
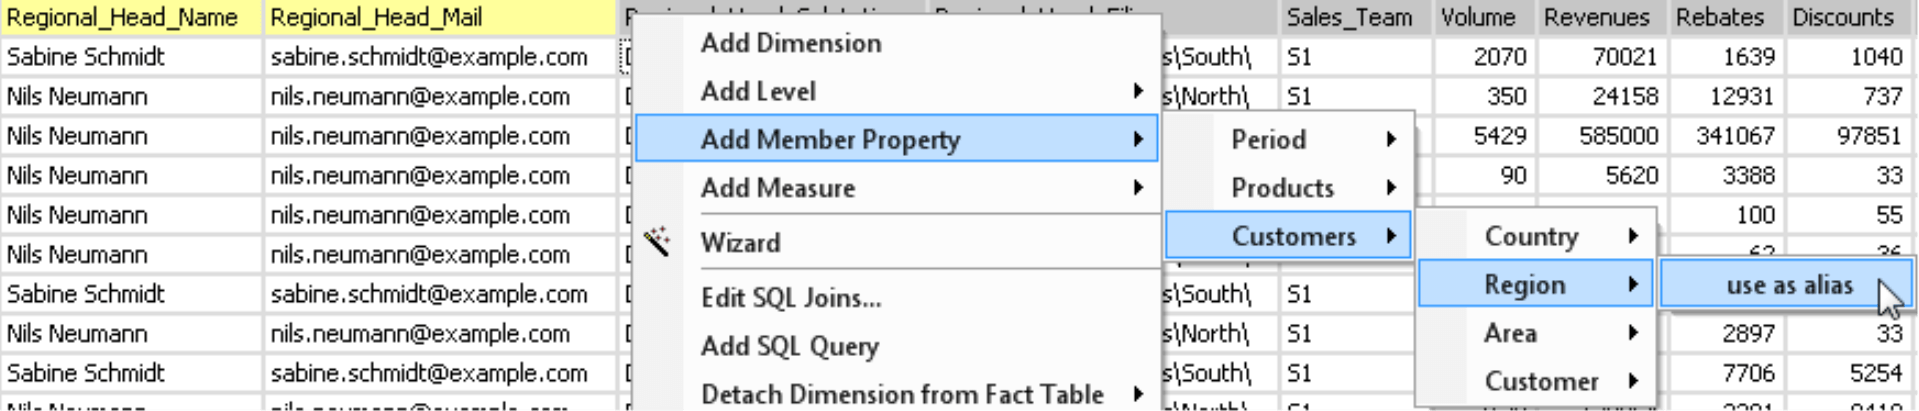
In the DeltaMaster TableWizard, this task is even easier because you can make the changes directly from the data view. The screenshot below, for example, shows a simplified version of the “Chair” reference model that doesn’t differentiate between fact tables and dimension tables and, therefore, stores all the data in a “flat” table. You can now Add member properties from the context menu, and choose the desired dimension and dimension level for that property using the cascading menus. The following examples will use this same simplified model.
You just need to complete this configuration once. Afterwards, you can administer the attributes for individual report consumers just as you would for any other master data.
Member properties in DeltaMaster
After you have modeled the data, you can access these properties in the DeltaMaster analysis session. In the Dimension browser, you can find them under Alias.
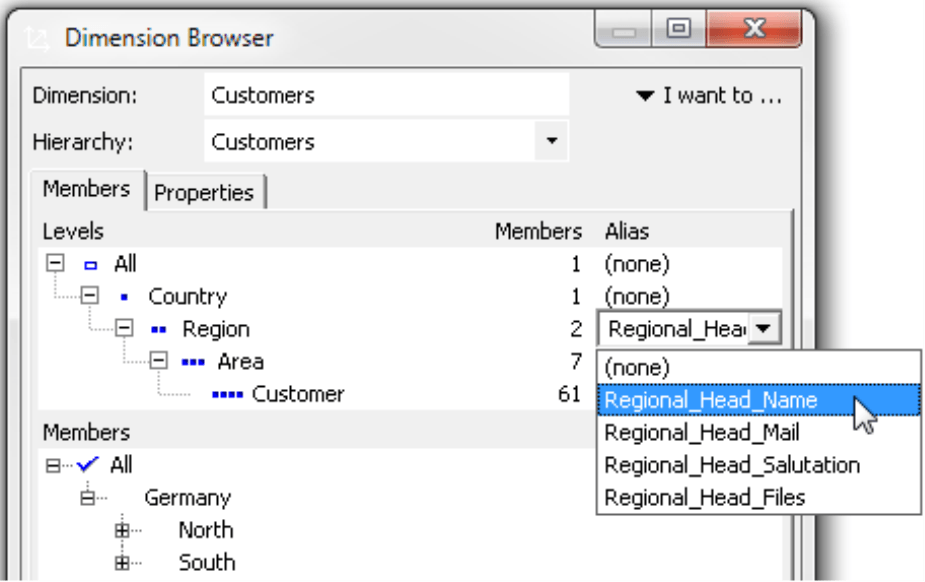
To get a quick overview of the properties, you can view them with all their values on the Properties tab.

You can use the property values in many different ways in DeltaMaster reports, cockpits, and analyses – for example, as additional columns in tables with further information on the products, customers, branch offices, etc. that are mentioned in the report. For now, however, we will simply focus on how you can use the member properties for personalization purposes in the ReportServer.
Report Generator
The ReportServer combines groups of tasks into a job that you can start either manually or automatically (e.g. at a specific time). The Report Generator, a field located in the bottom left corner of the ReportServer’s application window, is responsible for iterations or repetitions within a job and generates new reports for each of the selected members – in this case, the regional managers for the regions North and South. You can now use the Dimension browser to select the members you want to use in the customized reports. Alternatively, you could also enter an MDX expression. When you run a job, the ReportServer computes the analysis session that serves as a template for each member of this set in succession. Roughly speaking, it opens the Report source (i.e. the analysis session upon which the job is based) and internally sets the view to the current member for each report before calculating the report. The ReportServer then writes the results of these computations to a separate file. It then executes these steps successively for all selected members and generates a series of “target documents”, one for each report consumer.
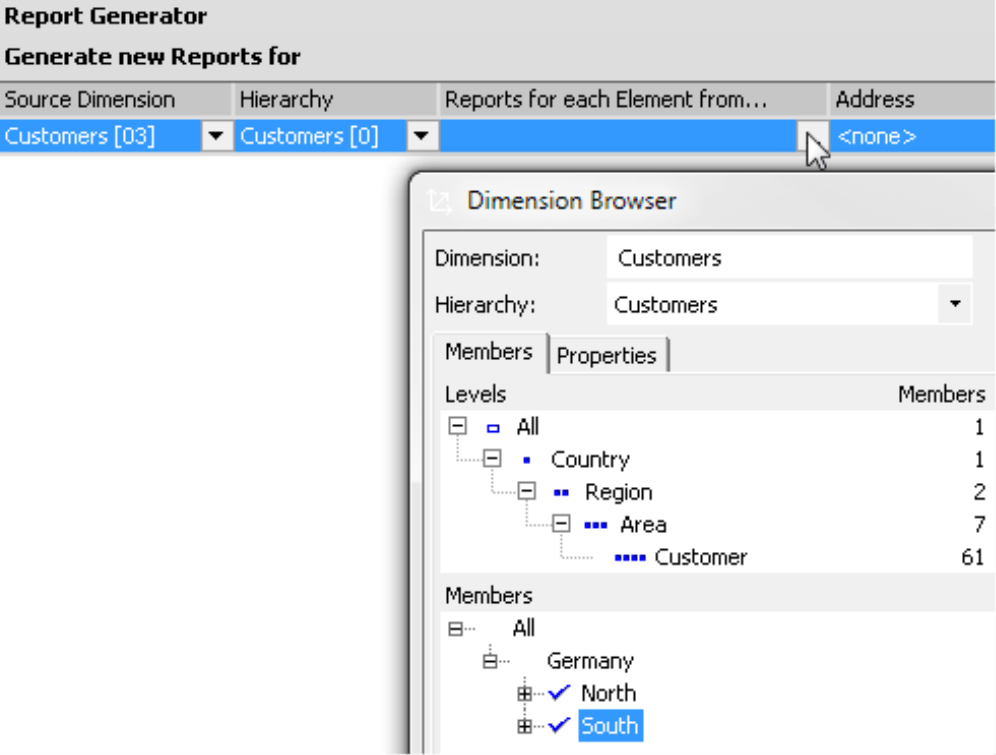
The Address field in the Report Generator plays an important role in creating personalized e-mails. The drop-down menu contains all of the member properties that are listed in the Source dimension/Hierarchy. This allows you to tell the ReportServer which member property contains the e-mail address for sending the report. In the screenshot on your right, this would be the member property “Regional_Head_Mail” on the level “Region”.
When you read the term “Address“, you probably immediately think of an e-mail address as in the example above, and you would be right. You could, however, also use it to carry other text information (e.g. initials or a short name that is added to the file name or a user directory on a file server) in order to differentiate or even distribute the generated reports.
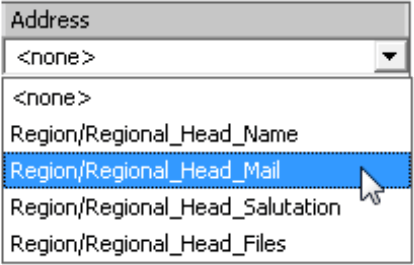
Report Generator variables
When the ReportServer executes a job, it processes each selected member separately, one after the other. In the job definition, you can use variables to refer to the member that is currently in the queue. This, for example, is important for the e-mail address. This address is stored in the data model and must be transferred to the Address field of the job definition in the ReportServer.
The following variables are particularly useful for creating personalized reports and e-mails:
| @IMN | Name of the current generator member |
| @IDA | Address of the current generator member |
| @Pxxyy | Member property value of the Report Generator member in the dimension with the ID “xx” and the member property with the ID “yy”. Please enter IDs without commas or spaces and place a “0” in front of any ID with single digits. |
Fortunately, you don’t need to memorize these variables. You can view them as a tooltip, for example, when you mouse over the Address field.
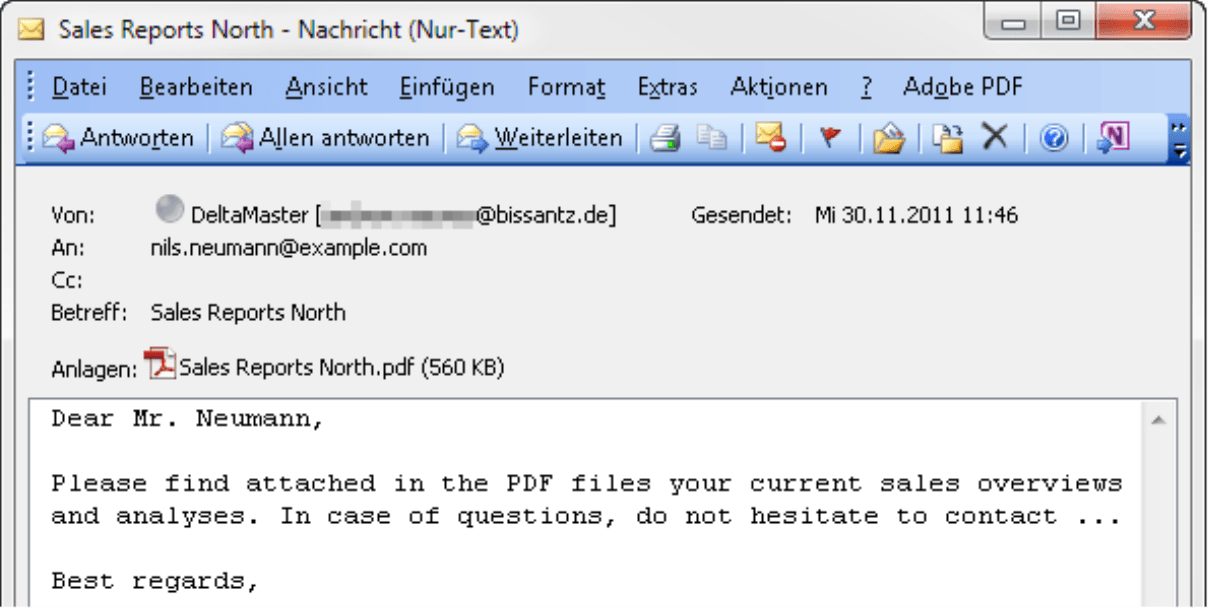
Through the use of variables, the ReportServer job can access information about the report recipients from the data model. When the Report Generator processes the first member (in this case, “North”), it replaces “@IMN” with the name of that member (i.e. “North”).
The variable “@IDA” has the value of the member property that was selected in the Address field of the Report Generator (in this case, the value of the property “Regional_Head_Mail”, which is “nils.neumann@example.com” for the member “North“). In the Address field for the job, you can also add additional recipients who are to receive the e-mail as a carbon copy or blind carbon copy. Simply place “CC:” or “BCC:” in front of the respective address and separate the addresses with commas (e.g. “@IDA, CC:salesmanagement@example.com, BCC:reporting@example.com“).
![]()
By following these steps, you can dynamically transfer each recipient’s e-mail address from the data model.
Many times, you will also need the name of the generator member – especially when you want the ReportServer to export the results as a series of PDF or Word files and store them in a specific directory instead of e-mailing them as attachments. In this case, you can use the “@IMN” variable to customize the file name. Otherwise, the ReportServer would overwrite the exported files or give them names that would only differ by an automatically incremented number appended to the name. If you enter the address “C:DeltaMasterExportSales Reports @IMN.pdf“, for example, the ReportServer will turn this into the names “Sales Reports North.pdf“ and “Sales Reports South.pdf“.
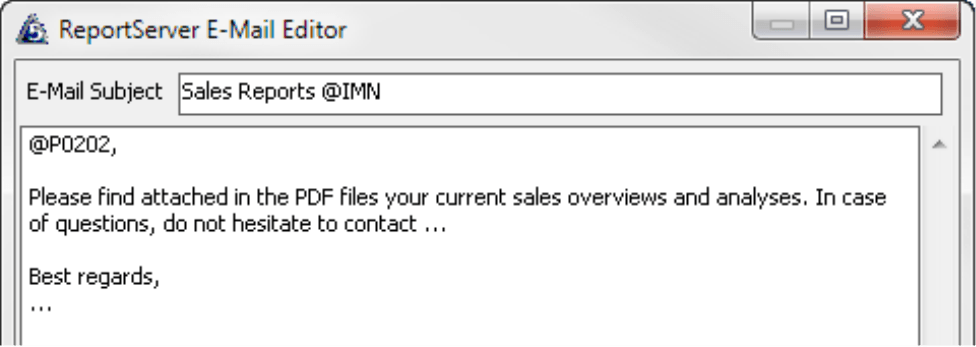
Besides supporting variables in the Address field, the ReportServer also supports them in the fields E-mail subject, E-mail body, and E-mail attachment. If you want the e-mail subject line to clearly state the content of the report, you can enter “Sales Reports @IMN” in the subject line. The ReportServer then turns this into the subject lines “Sales Reports North” and “Sales Reports South“.
Access to all member properties
As indicated in the table above, the ReportServer also supports a variable for the other member properties: “@Pxxyy”. In this case, “xx” stands for the ID of the dimension containing the desired member properties and “yy” for the ID of the properties themselves. The best place to find the necessary IDs is in the Model browser (Model menu). Our sample model includes a member property called “Regional_ Head_Salutation“. In the Model browser, you can now see that this property has the ID “2-0-2-2”. To interpret this ID, you need to read it from left to right: You are looking at the dimension with the ID 2 (“Customers/2“) containing the hierarchy with the ID 0 (“Customers/2-0“), which contains the level with the ID 2 (“Region/2-0-2“), which in turn contains the member property with the ID 2 (“Regional_Head_ Salutation/2-0-2-2“).
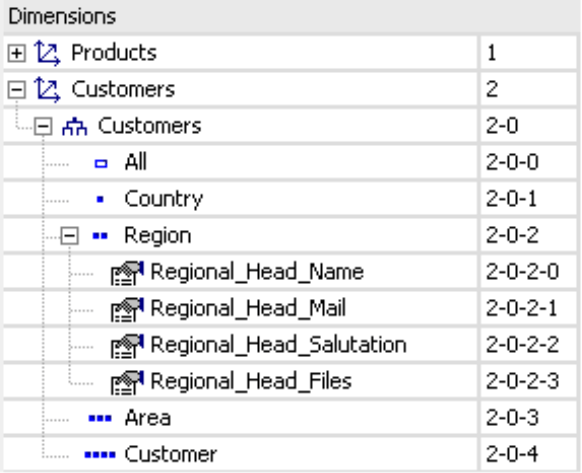
Write the two digits of the respective ID directly after each other without commas or spaces. If the ID consists of just a single digit, as they do here, you will need to place a 0 in front of it. To select the salutation, you would use the ReportServer variable “@P0202“. The first two digits indicate the ID of the dimension (“02” stands for “Customers“ as shown above) while the last two digits indicate the member property (“02“ for “Regional_Head_Salutation“).
Now you can also transfer the salutation to the generated e-mail messages. The resulting e-mail is shown on page 2.
E-mails without an attachment
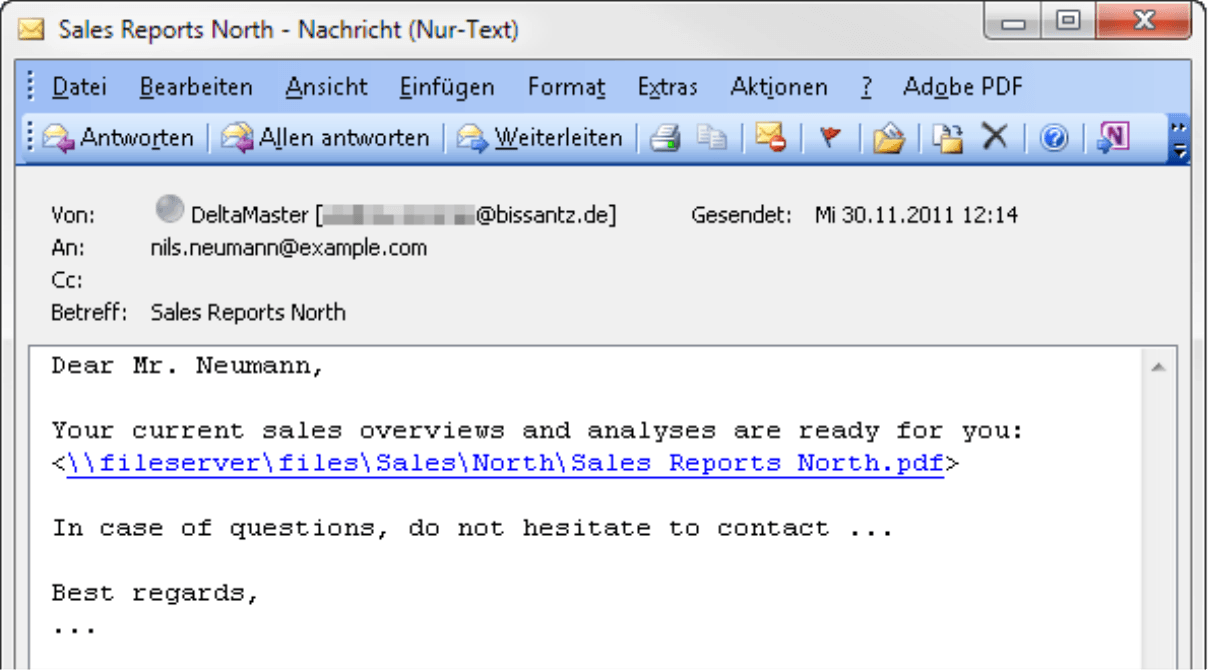
Sometimes, you might want to use this automated method simply to inform your audience that new reports generated by the ReportServer are now available – without sending any attachments. To do this, you will need to make a small modification in the E-mail attachment field of the job definition. If you specify a path in front of the file name and two asterisks (“**”) after it, the ReportServer will write the exported files to the designated path and send the e-mail without attachments. In this case, you should inform the recipients in the e-mail about how they can access the updated reports and where they are stored.
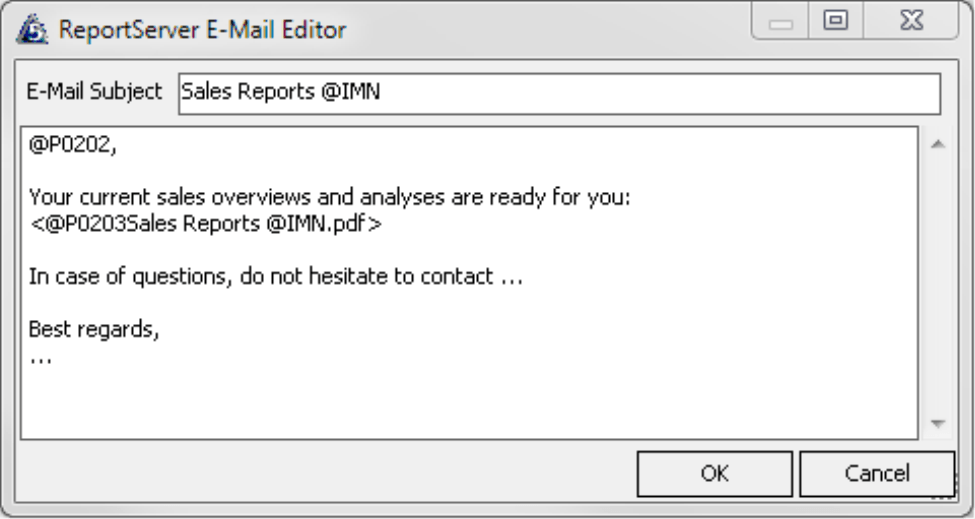
You can also use recipient-specific information in the path name as well – for example, a user directory that was also created using member properties. In our example, we created the “Regional_Head_Files” attribute for this purpose and entered values such as “fileserverfilesSalesNorth”. You can view this property’s ID (“3”) in the screenshot above. The report variable, therefore, is “@P0203”.
Using this information, you can now type the name of the E-mail attachment followed by the two asterisks.
![]()
Now, insert the same name – this time, however without the asterisks – into the E-mail body. To get Microsoft Outlook and other e-mail clients to display the document reference as a hyperlink even when it contains spaces or is longer than a single row, you may wish to place the path and file name in angle brackets (“<…>“).
With these settings, the ReportServer generates the desired export file and informs the e-mail recipient that a new report is available and where it is located, but without sending the actual file.
Please note that in order to use this type of report distribution, the user executing the ReportServer job must have write access to the specified directory.
Reports in HTML format
The methods that you have seen up until now apply to report formats that are sent as e-mail attachments, for example, DeltaMaster analysis sessions, PDF files, Excel sheets, or PowerPoint slide shows. Many people, however, like to send reports as HTML e-mails.
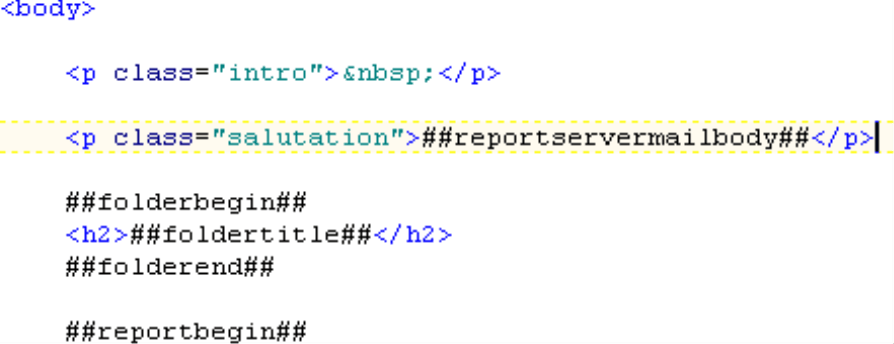
In an HTML e-mail, the report is directly embedded in the e-mail – not added as an attachment. When you select “html” as the Report format, therefore, the E-mail body field initially has no effect because the content of the e-mail is created by the HTML export, not by the e-mail dispatch component of the ReportServer. Nevertheless, you can still personalize this information by entering a variable in the export template for the E-mail body generated by the ReportServer.
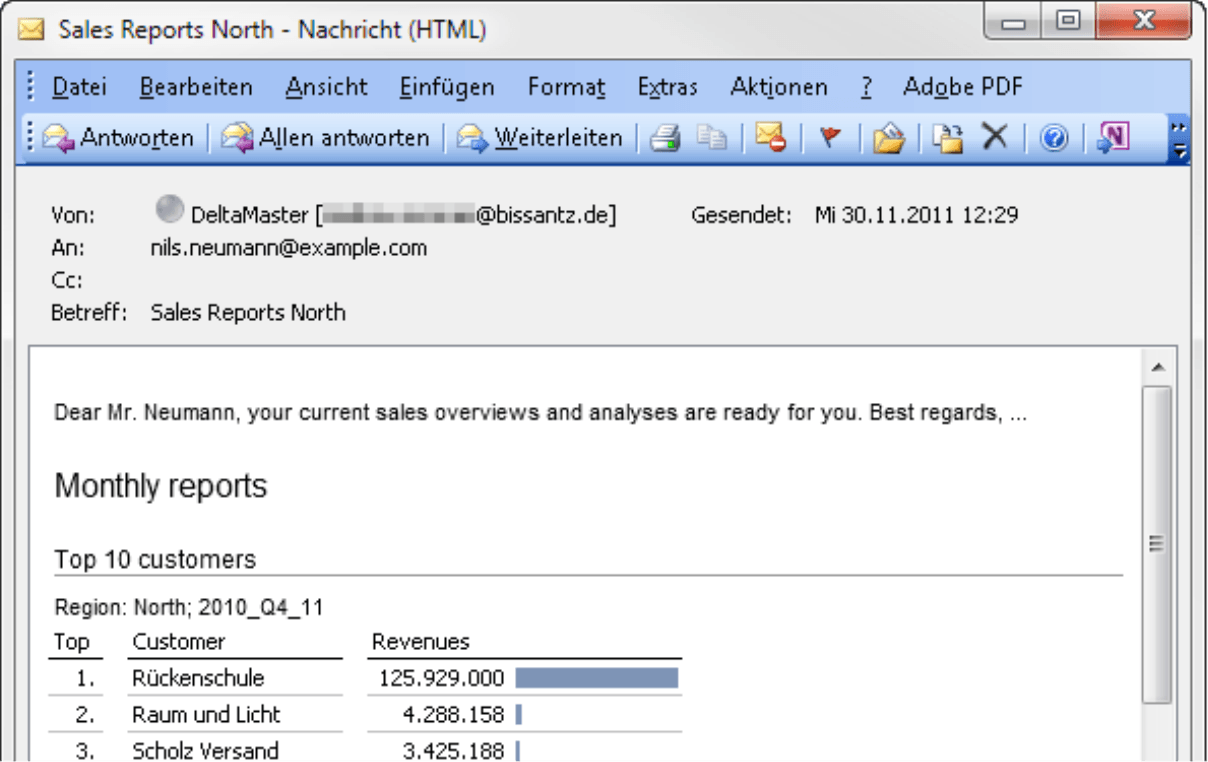
This is where the HTML export variable “##reportservermailbody##”comes into play. When the ReportServer exports an HTML report, the system replaces this variable with the contents of the E-mail body field. Please note that HTML tags in this text are currently not supported. As is the case for other components of the export template, you can use style sheets (CSS) to format the text.
More dynamic
The ReportServer is an extremely powerful and flexible tool for data-driven automation. It offers a wide range of possibilities to include your current data in automated processes. You could, for example, use variables to access selected measures in the reports that you want to distribute and to list them in the e-mail subject line. Alternatively, you could use the ReportServer to identify and highlight changes in reports, for example, new customers that were not listed in the previous revenue analysis. We will explore these topics in future issues of clicks!. We discussed the topic of exception reporting back in DeltaMaster clicks! 11/2008.
Questions? Comments?
Just contact your Bissantz team for more information.
