![]()
Greetings, fellow data analysts!
If you want to send information or write a letter to more than one person, you inevitably come in contact with placeholders, fillers, or variables as they are called in the world of data processing. Letter drafts and templates, for example, often start with “Dear Mr. …,”. This ellipsis is also a variable because you want to replace it with the respective last name in the output. The Publisher or the ReportServer of DeltaMaster provide a highly efficient way to automatically send information to or communicate with people. Each job in Publisher, so to speak, is a correspondence draft or template, where you can clearly define how the reports should be updated, modified, and distributed. You can choose from a series of variables to make these individual modifications. In this edition of clicks!, we will explain what they are and what you need to know about them – in full and without fillers.
Best regards,
Your Bissantz & Company team
With the DeltaMaster Publisher or ReportServer, you can customize reports for different recipients. This individualization occurs in at least two different ways: On the one hand, the reports should be individualized regarding their content. They should show the exact data that is intended for the user and for which he is responsible. On the other hand, the output should be technically individualized so that a separate email is sent or a file is saved for each recipient. Each recipient, of course, has a different email address, and each file needs its own unique file name or storage location so that it is not written over when the Publisher processes the next member.
In the last edition of clicks!, we discussed the first aspect, which is how to customize the content of reports through the View (i.e. the Filter settings of the reports). The Publisher can automatically modify reports, even repeatedly in a loop for several members (i.e. iteration) with the Report Generator. In this edition, we will show how you can individualize the output. The answer is simple: with variables!
Individualization through variables
You can define the automatic modifications of the Publisher in the job definition – specifically, in the Report Update, Report Folders, Report Generator, and Report Recipients windows.
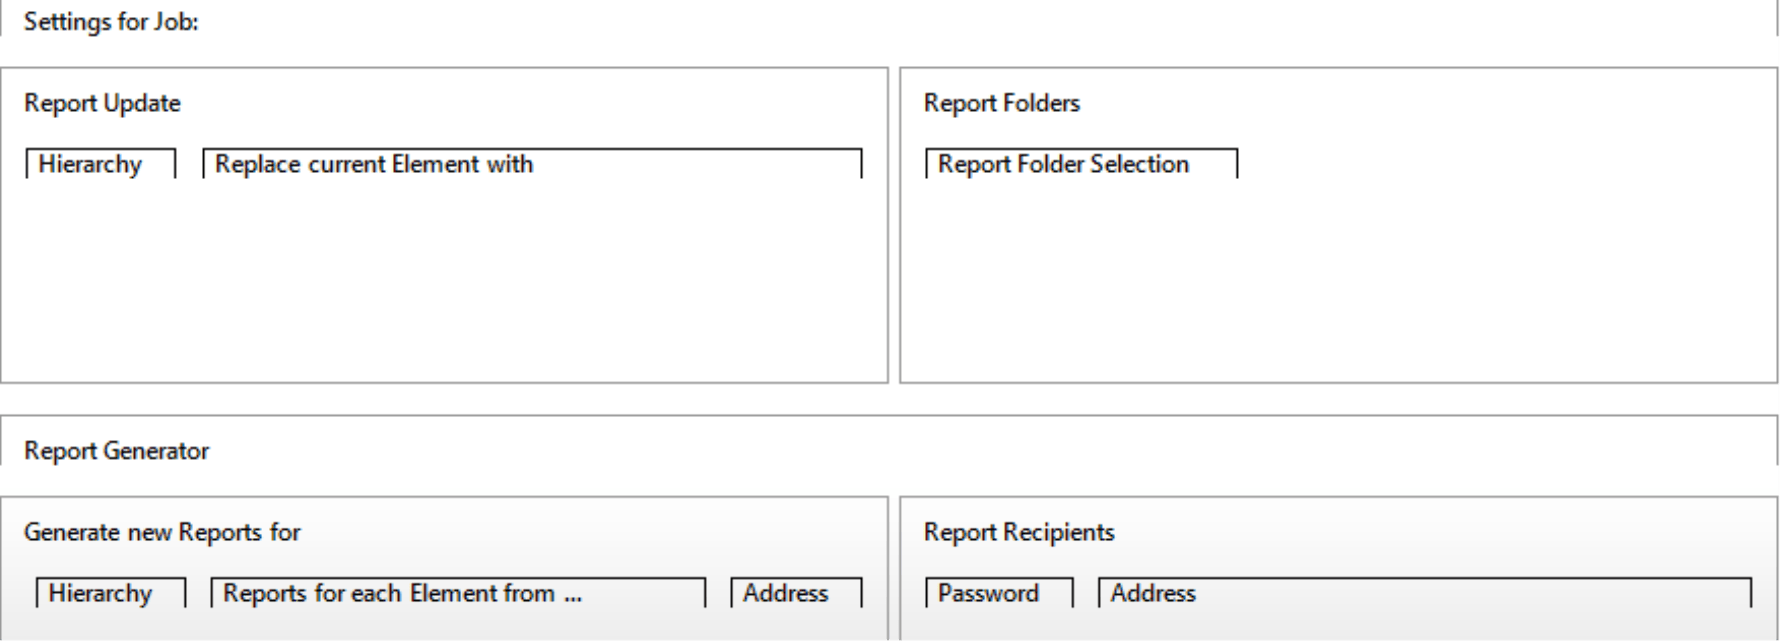
Everything you can define in these four sections can be accessed through variables and thus be used to customize the output:
- Names and properties of members from the ReportUpdate
- Names of the Report Folders
- Names and properties of members that the Report Generator processes successively (iteration)
- Addresses of Report Recipients that can be assigned to the Report Generator members. We will talk about the address in more detail below.
These four sections serve as the “sources” for the variables: Here is specified where they obtain their values. You can use variables in the fields of the job definition, in particular: the Address field (to describe variable file names, directories in the file system, and email addresses). Export Template, E-Mail Subject, E-Mail Body, E-Mail Attachment, and Notification (further right in the job definition, not pictured here) are other areas where you frequently use variables.

When running a job, the Publisher replaces the variables with actual attributes, such as the month selected in the Report Update, the name of the branch or cost center manager from the Report Generator, or the email addresses which are assigned to them. For example, this would transform the address “C:Chair AG@IMN.doc” to “C:Chair AGSouth.doc”.
Publisher variables, part 1
You can use the following variables to reference changing components from the four windows in the fields of the job definition.
| @Dxx | Name of the Report Update member in the dimension with the ID xx. The variable name stands for “dimension”. |
| @Pxxyy | Member property of the Report Update or Report Generator member in the dimension with the ID xx and the member property with the ID yy. The variable name stands for “property”. |
| @Fxx | Name of the Report Folder with the ID xx. The variable name stands for “folder”. |
| @IMN | Name of the current Report Generator member. The variable name stands for “iterator member name”. |
| @IDA | Address assigned to the current Report Generator member, either in accordance with the address of the selected member property in the Report Generator window or the address list in the Report Recipients window. The variable name stands for “iterator distribution address”. |
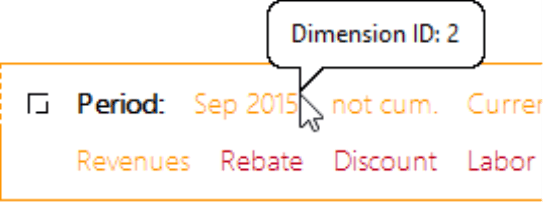
The IDs are numeric values, which are easy to identify in a DeltaMaster session. In Modification Mode of DeltaMaster 6, hold the Alt key and mouse over the respective object: a dimension in the Filter Bar or a folder in the Report List.
When Modelling, you can determine the ID of a member property (i.e. “yy” in “@Pxxyy”) with the help of the Dimension Browser. Open on the Levels tab the menu in the Alias column and count the position of the desired property. “(none)” has the ID ?1 and cannot be used in the Publisher. The next properties are 0, 1, 2, etc. This is also the case in DeltaMaster 5, where the View window is equivalent to the Filter bar. You can find the ID of a member property in the Model Browser (Model menu in Miner mode) on the Model tab.

All IDs must be entered as a two-digit number, if necessary, starting with a zero. For example: “@D01” for the dimension with the ID 1.
If the Publisher cannot resolve a variable, it will state this in the Monitor (DeltaMaster 5: Event Log) and reference the variable name instead. This makes it easy to recognize errors. A generated file named “@IMN.doc”, for example, is a sign that no Report Generator was defined.
The export type “file” displays the Address of the file name and the path of the file. You can enter both, including the path, using variables (e.g. “C:Chair AG@IMNSales.doc”). If the directory does not yet exist, the Publisher will generate it automatically.
Further variables are listed at the end of this clicks!.
Addresses of report recipients: the variable “@IDA“
Just to recap: You can use variables to reference and reuse whatever the Publisher is respectively processing. When sending a report as an email (distribution type “mail”), you will even need two variables instead of one: the name of the current sales region and the email address of the person who should receive the generated document. This is what the variable “@IDA” does. It returns the address that is assigned to the currently processed Report Generator member “@IMN”.
You can assign members and addresses in two different ways:
- Including them in the analysis model as member properties
- Maintaining them directly in the Publisher in the Report Recipients window. Through this mechanism, you can automatically generate and distribute reports with each application, regardless of the data model and without having to modify it.
On a side note: Even though we have been and will continue to talk about email addresses, you can apply this technique for other types of text components (e.g. E-Mail Subjects) that you want to insert into file or directory names for specific users.
Using addresses from the analysis model
Member properties provide additional information about dimension members. You can use them in many different ways, for example, to provide master data characteristics from an ERP system, aliases, or terms in several languages in the analysis model. You can also save email addresses of field sales representatives, branch directors, cost center managers, product managers, department heads, etc. as member properties, provided that they are available in the model as a separate dimension member.
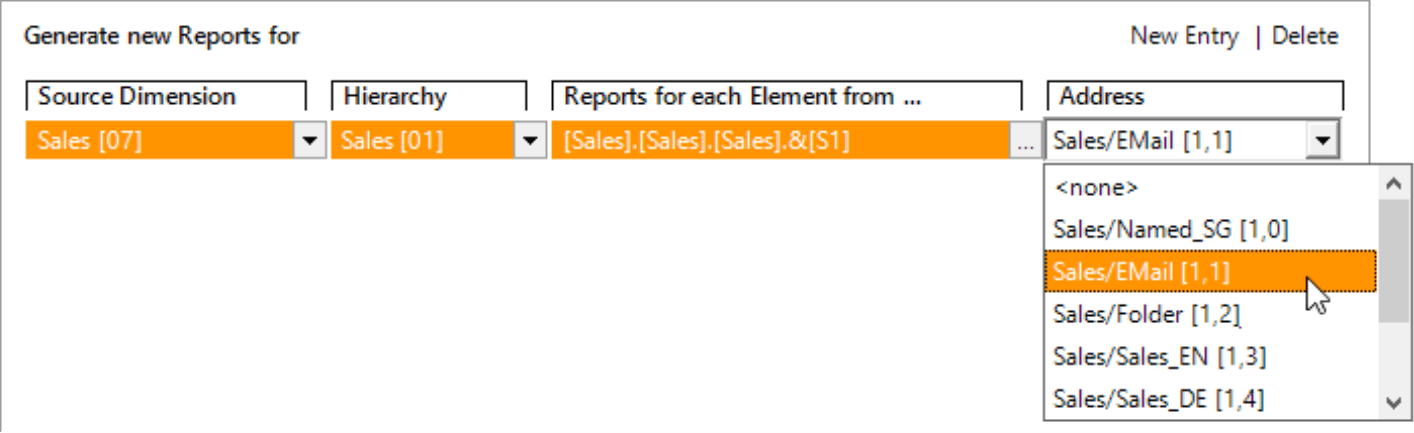
In the Report Generator, you can select which member property should be used as an address for each entry (for each dimension).
Maintaining addresses in the Publisher
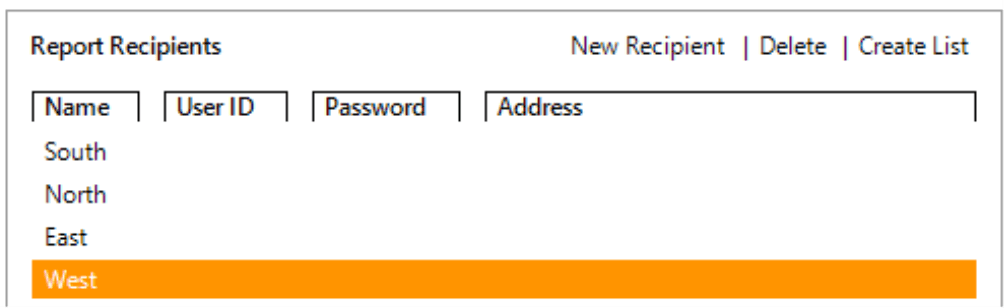
Alternatively, you can assign the desired addresses to the members of the selected Report Generator in the Report Recipient window. The name of a member is displayed in the left side of the list. On the right side, enter the Address that you want to use for this member.
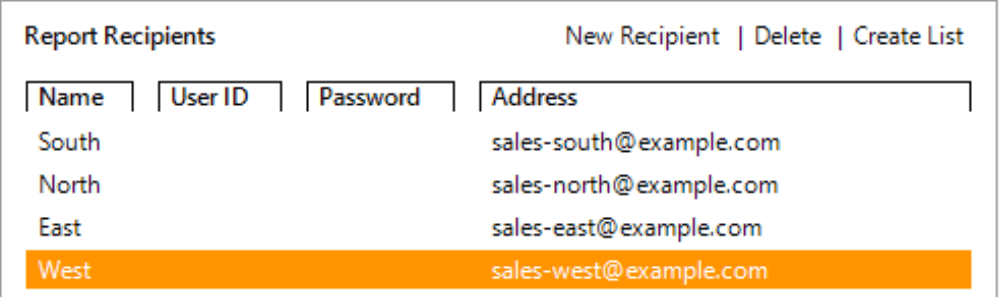
You can modify the list using the commands in the upper-right part of the window
| New Recipient | Creates a new, empty entry in the list. Enter the name of the member and the address. This command is very useful if you want to save an address for a member that isn’t currently or is not always contained in the Report Generator because it depends on a condition defined as an MDX query. To set up an empty list for the first time or extend an existing one, however, it is simpler to create the list. |
| Delete | Deletes the selected row (no confirmation prompt). |
| Generate List | Generates or updates the recipient list based on the current specification in the Report Generator. The Publisher will add a new entry for each member that is not already referenced in the Report Recipient window. If a member is already referenced, the entry (Address, User ID, and Password) will remain as is. Members that are in the current recipient list but no longer appear in the member selection will be removed. |
| Setting up the list for the first time is fast and easy. With just one click the Publisher will generate thelist and you can enter the respective Addresses for the automatically generated Names. | 
|
Optionally, you can store specific User IDs and Passwords for the individual members. Using the permissions of the respective user, the Publisher can then log in to the database to gain the same database view as the user. User IDs and passwords are stored without encryption in the Publisher database.
The Report Recipients window is only activated when a Report Generator is selected. As soon as at least one Name is entered, the Publisher works according to the list and expects that an entry is available for each Report Generator member. If an entry is missing, Publisher will skip over this member, generate no output, and note this in the Monitor or Event Log. If an entry is available but the Address is empty, it will take the value from the member property assigned to it in the Report Generator. If this is missing as well, the Publisher will enter the variable name “@IDA”.
Examples
The following example illustrates the functionality of the variables. Here we have created two jobs that generate and distribute reports from the same analysis session (report source). The first job should export Word documents and save them locally while the second should send the reports as an HTML mail.

The following processing rules are valid for both jobs:
- Select “Aug 2015” in the time dimension (with the ID 2) under the Report Update
- Include only the Report Folder “Sales” (with the ID 10)
- Iterate over the members “North”, “South”, “East”, and “West” in the Report Generator.
For the first job, the Address is: “C:Chair AG@F10 @IMN, @D02.doc”. The Report Recipients window stays empty.
When you run the job, it will generate four separate documents with meaningful names. It will also set the filters which are included in the reports.
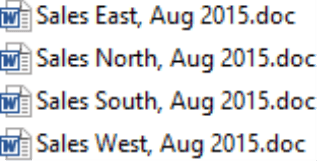
For the second job, the Address is simply “@IDA”. In the Report Recipients windows, a list is created similar to the one on page 5. The address “sales-south@example.com” is assigned to the member “South”, “sales-north@example.com” is assigned to the member “North”, etc. The designation that shows which analyses, regions, and periods are covered is included in the E-Mail Subject: “@F10 @IMN, @D02”.
If you run the job, it will send four emails with customized subject lines and report content to four different email addresses.

These types of mails are especially valuable when the subject line doesn’t just announce the information but proclaims it by quoting the most important KPI(s) from the report. You can do this using the variable “@Report” as mentioned in the following section and listed in the source named there.

Further examples, including how to modify the output with member properties (“@Pxxyy”) and personally address your mails, are described in DeltaMaster clicks! 11/2011 (“Sending personalized emails with Report Server”).
Publisher variables, part 2
The variables described above refer to components of the job definition. There are others, however, that you can also use to modify the output of the Publisher. For the sake of completeness, we will list them here as well.
Variables for report content (cell values, changes over the previous calculation)
The following four variables refer to the report content. They are primarily used to modify the subject line and the text of automatically generated emails (E-Mail Subject and E-Mail Body fields in the job definition).
| @Reportx!RyCz | Value of the cell in row y, column z in report x. |
| @Reportx#R | Number of rows in report x. |
| @Reportx#+R | Number of rows added to report x since the last completed job. |
| @Reportx#-R | Number of rows removed from the report x since the last completed job. |
You can find the report ID x the same way that you would find the ID for dimensions and report folders: In Modification Mode, hold the Alt key and mouse over the report in the report list.
For more detailed information, please read DeltaMaster clicks! 06/2013 (“Enhancing e-mail subject lines with values from reports”) and 06/2015 (“Highlighting changes in automatically updated reports”).
Variables for export templates
The Publisher can also replace variables when running an export based on custom templates and standard ones for Microsoft Office and PDF formats (i.e. “DeltaMaster.dot/.pdf/.pot/.potx/.xlt” files). When the following variables are added to export templates, they will be replaced in the output files.
| @shortdate | Date of the export in short format based on the Windows settings (e.g. “7/14/2016”) |
| @shorttime | Time of the export in short format based on the Windows settings (e.g. “01:59 PM”). |
| @longdate | Date of the export in long format based on the Windows settings (e.g. “Thursday, July 14, 2016”) |
| @longtime | Time of the export in long format based on the Windows settings (e.g. “01:59:12 PM”). |
| @database | Name of the database upon which the report source (application/analysis session) is based |
| @cube | Name of the OLAP cube upon which the report source is based |
This allows you, for example, to embed the creation date on the title page of a Word file. The Publisher also recognizes and replaces these variables in the Address, E-Mail Subject, etc. Please note, however, that time and short dates are not suitable Addresses for the Distribution Type “file”. The reason is that the typical output for time uses a colon (e.g. “01:59”) and the output for short dates uses slashes (e.g. “7/14/2016”), which are not allowed in file names.
Variables for language
In the job definition, you can select one or more (interface) languages and alias sets in which the report source should be implemented (DeltaMaster deltas! 5.5.4, feature #9). This, too, is an iteration that you can reference with variables.
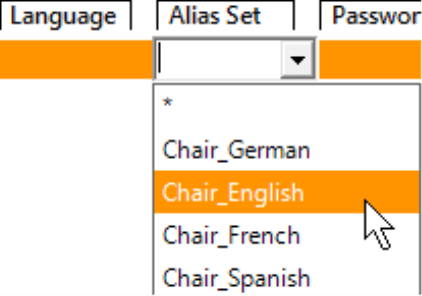
| @aliasset | Current alias set from the iteration over the members in the Alias Set of the job definition. |
| @language | Current language from the iteration over the members in the Language field of the job definition. |
The variables are important for the Address (e.g. when a job should output documents in several languages) as well as the Export Template (e.g. if the export should be based on language-independent templates).
Variables for the CSV export
When exporting to CSV format (comma-separated values), each exported table will be written to a separate file. This makes it easier to transfer the data to other systems. CSV is different from the other export formats where all reports are only written to a single file. This means the Address for a CSV export must be able to differentiate individual reports. The following variables do just that:
| @rid | ID of the currently processed report. The variable name stands for “report ID”. |
| @rn | Name of the currently processed report. The variable name stands for “report name”. |
The CSV export is explained in detail under DeltaMaster deltas! 5.4.9, feature #9.
